
Made in America (NJ)
for your Wall Decor
Handcrafted Picture Frames

You’re standing there, hammer in one hand, a beautifully framed photo in the other, staring at a blank wall. The fear of making that first hole, only to find it's an inch too high or completely disconnected from the sofa below, is real. We see it all the time at our NJ frame shop; you’ve invested in a quality, handmade frame for a cherished memory, but the final step feels like a high-stakes math problem. This hesitation is why so many amazing pieces end up leaning against a wall for months.
It's time to hang your art with total confidence. The secret isn't a complex calculation; it's a single, expert standard used by galleries and designers worldwide. In this guide, we'll teach you exactly how high to hang pictures by mastering the 57-inch rule. This is the foolproof method our own expert framers use to ensure every piece is perfectly centered at eye level, creating a natural and professional look. Get ready to learn the simple math for any frame size and finally give your art the museum-quality presentation it deserves.
If you've ever felt uncertain about where to place that first nail, you're not alone. The most common question our expert framers hear is, "Exactly how high to hang pictures for a professional look?" Forget the vague advice to hang art at "eye level." The secret used by gallery curators and interior designers for decades is a simple, precise measurement: the 57-inch rule.
This standard dictates that the vertical center of your artwork, regardless of its size, should be positioned exactly 57 inches up from the floor. Why this specific number? It represents the average human eye level, a standard adopted by galleries and museums like the MoMA in New York to provide a consistent and comfortable viewing experience for the widest range of people. Using your own eye level is a recipe for visual chaos; a room where art is hung for a 6'3" person will feel disjointed and unsettling to someone who is 5'4". The 57-inch rule creates a single, unifying sightline throughout your home.
The psychological effect is powerful. When all your art shares a common centerline, it establishes a sense of harmony and intentionality. Your eye moves smoothly from one piece to the next, creating a calm, cohesive environment. This practice is a direct application of core Interior Design Principles, where balance, rhythm, and scale work together to build a space that feels resolved and professionally curated. It's the single most effective trick to make your collection of handmade frames look like a purposeful exhibition.
The 57-inch mark isn't arbitrary; it's based on the typical line of sight for an adult standing in a room. Hanging art too high is a rookie mistake that creates a visual disconnect between the art and the furniture below it, forcing viewers to crane their necks. For rooms where you're primarily seated, like a dining room or home office, consider lowering the centerline to 48-52 inches from the floor so the art is viewed comfortably from a chair.
Of course, great design knows when to bend the rules. For rooms with soaring ceilings above 10 feet, you may want to raise the centerline to 60 inches to better match the room's grand scale. Conversely, a very small piece, like a single 5x7 frame, might feel lost. Consider grouping it with other pieces in a gallery wall. The rule also changes when art is part of a functional "station," like above a mudroom bench, where its placement is dictated by the surrounding objects.
While the 57-inch rule gives you a target for your art’s center, it doesn't tell you where to hammer the nail. Guesswork leads to extra holes and frustration. The good news is that a simple, four-step calculation removes all uncertainty, giving you the exact height for your nail or hook every single time. This formula is the professional's secret to knowing precisely how high to hang pictures for a flawless, gallery-worthy result.
Grab a measuring tape, your framed art, and follow this straightforward process:
Hanging wires offer flexibility but can easily throw off your math if you're not careful. To get an accurate "drop" measurement, don't measure the wire while it's slack. Instead, use your finger or the end of your measuring tape to pull the wire taut towards the top of the frame, simulating the tension it will have when hanging. This simple action can prevent your art from drooping by a full inch or more, which is a significant visual error.
Fixed hardware like D-rings and sawtooth hangers requires absolute precision. Unlike a wire that can be slightly adjusted on a hook, these mounts offer zero wiggle room. This is where the painter's tape trick becomes invaluable. This level of precision is common in professional galleries; in fact, you can find similar expert tips for hanging art from world-renowned sources like Christie's, who emphasize meticulous preparation. The tape trick involves using a strip of painter's tape on the back of your frame to perfectly mark the hardware locations, which you can then transfer directly to your wall. For frames with two D-rings, simply stretch a piece of tape across the back, mark the center of each ring with a pencil, peel the tape off, and place it on the wall using a level. You now have perfect guides for your two nails.
The type of hardware often depends on the frame's weight and style. To ensure stability and ease of use, all of our custom handmade frames come with high-quality, pre-installed hardware suited for their specific design, simplifying this crucial step for you.
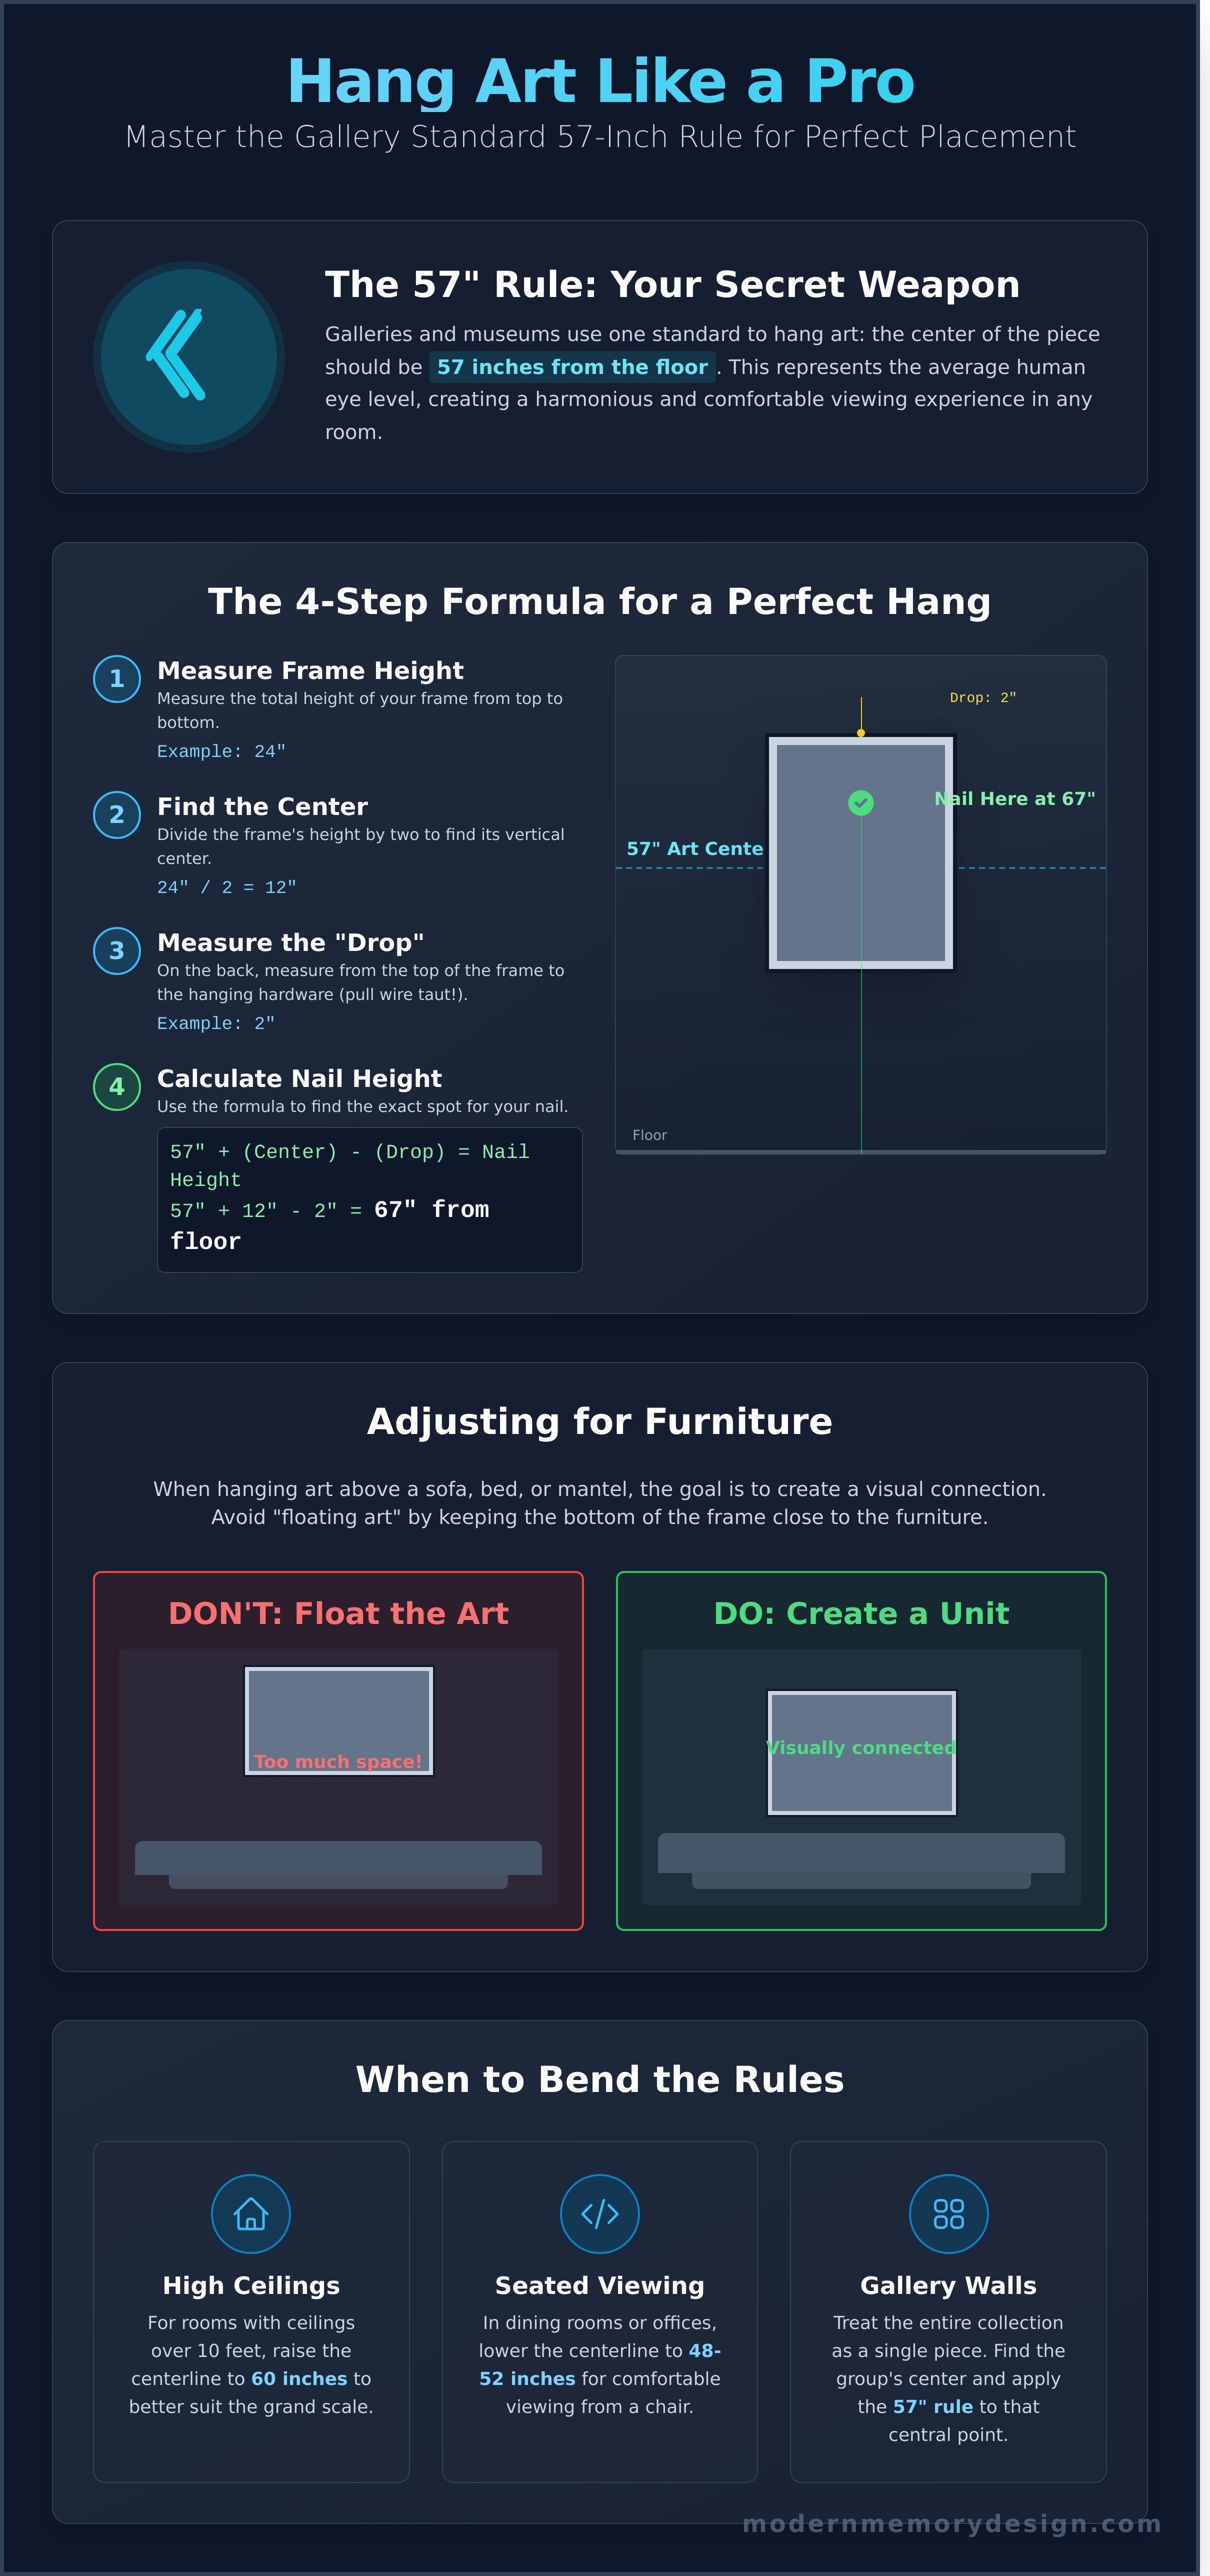
While the 57-inch rule is an excellent standard for a blank wall, it doesn't apply when you introduce furniture into the equation. Placing art above a sofa, headboard, or console table requires a different approach. Here, the goal is to create a cohesive and intentional visual unit where the art and furniture feel connected. This relationship is key to a professionally designed space and helps you avoid the common mistake of "floating art"-where a piece hangs in a lonely void between the ceiling and the sofa.
The most important guideline for hanging art above furniture is the 6-to-8 Inch Rule. The bottom edge of your frame should be positioned just 6 to 8 inches above the top of the sofa back or credenza surface. This small gap is crucial; it visually anchors the artwork to the furniture, creating a single, grounded composition. Any wider, and the piece begins to feel disconnected. Getting this spacing right is a foundational step for those learning how to hang art correctly, as it directly impacts the room's overall balance.
Scale is just as critical as height. To ensure your art looks properly proportioned, follow the Two-Thirds Rule: your artwork (or a grouping of frames) should be roughly 60-75% of the width of the furniture it's hanging over. For example, above an 84-inch-wide sofa, your framed art should span between 50 and 63 inches. Finally, always center the art on the furniture, not the wall itself. This creates a powerful focal point, even if your sofa is positioned off-center in the room.
Before you commit, take stock of your tabletop decor. If you have tall lamps, vases, or sculptures, you may need to adjust your art's placement to avoid a cluttered or cramped look. The goal is harmony, not competition. Sometimes, raising the art to 9 inches provides the necessary breathing room for your decor to shine.
The fireplace is often the natural focal point of a room, and the art you place above it should complement it perfectly. The question of how high to hang pictures over a mantel is usually answered with a slightly tighter gap. Aim to hang your piece so the bottom of the frame is 4 to 6 inches above the mantel shelf. This maintains that essential visual connection in a space that's often vertically prominent.
However, you must consider the "heat zone." Heat and soot from a functioning fireplace can cause irreparable damage to custom frames, canvases, and prints over time. Always check your fireplace’s specifications for safe clearance distances. For a more casual, no-damage alternative, consider the "mantel lean." If your mantel is at least 5 inches deep, leaning your art against the wall provides a stylish, layered look that's easy to change with the seasons.
The 57-inch rule provides a perfect baseline for a single piece of art, but what happens when you're working with a collection of frames or a single, dramatic oversized piece? The core principle of eye-level viewing still applies, but the execution requires a few professional adjustments. The question of how high to hang pictures becomes a matter of treating the entire arrangement as a single, cohesive visual unit.
A gallery wall isn't just a random assortment of pictures; it's a curated collection that functions as one large-scale piece of art. To hang it correctly, you must find the visual center of the entire grouping and place that point at the 57-inch mark. Don't center the individual frames. Instead, think of the whole collection as being inside one giant, invisible frame.
Here’s the expert process for a flawless layout:
Once your templates are arranged, measure the entire grouping's height and width to find its true center. That’s your 57-inch mark. For more layout strategies and visual inspiration, explore our complete guide to Gallery Wall Ideas to Transform Your Space.
Large and oversized frames (typically those over 40 inches tall) are the exception that breaks the 57-inch rule. If you center a 60-inch-tall frame at 57 inches, the bottom will hover a full 27 inches off the floor, feeling disconnected from the room's furniture and architecture. This is a common situation where the standard advice on how high to hang pictures requires a more nuanced approach.
For these statement pieces, visual balance is more important than a mathematical formula. Aim to hang the art so its bottom edge is between 6 and 9 inches above the piece of furniture it's complementing, like a sofa or a console table. It’s also critical to leave at least 12 inches of blank wall space between the top of the frame and the ceiling to avoid making the room feel shorter than it is.
An oversized piece is an investment that catches a significant amount of ambient light. To prevent fading and damage over time, it's essential to use archival materials. Protect your oversized masterpiece with the right components. Our experts at Modern Memory Design can craft a custom, handmade frame with museum-quality UV-protective glass and acid-free backing to ensure your art remains vibrant for decades.
You’ve measured your walls and found the perfect centerline. You understand the theory behind how high to hang pictures for maximum impact. Now comes the most critical part: execution. A perfectly placed piece of art can be ruined by a crooked frame or, worse, a crash to the floor. Securing your art properly requires the right tools, the correct hardware, and an expert touch.
Every successful installation begins with a basic toolkit. Don’t start a project without these essentials:
The structural integrity of your display depends entirely on choosing the correct hardware. A frame’s weight is the deciding factor. For a lightweight frame under 10 pounds, a simple nail or standard picture hook often works. But for heavier pieces, you need more support. This is especially true for drywall, which can't support significant weight on its own. The quality of the frame itself also matters. Our custom, Made in the USA frames are built with superior structural integrity, providing a solid foundation that hangs securely and remains stable over time, unlike flimsy, mass-produced alternatives.
For frames weighing over 20 pounds, standard hooks are not enough. You’ll need a drywall anchor like a toggle bolt, which expands behind the wall to distribute the weight across a wider surface area. For exceptionally heavy items like large mirrors or oversized art, a French cleat system provides the most secure support. Always use a bubble level on every single piece; your eye can be easily deceived by ceiling slopes or floor angles. Finally, apply small rubber or felt bumper pads to the bottom corners on the back of your frame. They prevent scuffing and allow air to circulate, protecting both your art and your walls.
Sometimes, the complexity of the job calls for an expert. A multi-piece gallery wall, an oversized mirror, or a treasured family heirloom requires a professional’s precision and experience. This is especially true for our custom, heavy jersey shadow boxes or large-format printing projects, where improper handling can damage both the art and the wall. For clients in our local area, we provide a solution that guarantees a perfect, secure installation every time. Our team has the tools and expertise to handle any project, no matter the scale or complexity. If you're ready for a flawless, stress-free installation, we can help. Book our Professional Picture Hanging Service in NJ & NYC today and let our experts handle the rest.
You no longer have to guess where the nail goes. With the gallery-standard 57-inch rule, you have a reliable starting point for hanging art at the perfect eye level. From there, you know how to make critical adjustments, like leaving 6 to 8 inches of breathing room above a sofa, or how to group multiple pieces into a cohesive gallery wall. Mastering how high to hang pictures is the key that unlocks a polished, professionally designed look for any room in your home.
Of course, perfect placement is only half the story; it needs a frame that honors the memory within. At Modern Memory Design, we bring that same expert precision to every project. Since 2014, our skilled artisans have been handcrafting frames with museum-quality, archival materials right in our New Jersey workshop. For residents in the NYC and NJ area, we can even bring our expertise to your door with professional hanging services. When you’re ready to give your art the finish it deserves, shop our custom frames handmade in the USA.
Go ahead and hang your art with the confidence of a pro. You've got this.
The 57-inch rule is a professional guideline stating the vertical center of a picture should be 57 inches from the floor. This measurement represents the average human eye level, which is the standard used in most art galleries and museums. Following this rule ensures the artwork is positioned for comfortable, natural viewing. It creates a harmonious balance in the room, regardless of ceiling height, by anchoring the art to a human scale.
You should still hang the picture with its center at 57 inches from the floor, even with 10-foot ceilings. Art should relate to human scale, not the architectural scale of the room. Hanging art higher to fill the empty wall space can make it feel disconnected from you and your furniture. For exceptionally large pieces over 60 inches tall, you can raise the center point to 60-65 inches to maintain visual balance.
It's always better to hang a picture slightly too low than too high. Art hung too high feels disconnected from the room's furniture and creates an awkward visual gap. A lower placement, closer to the 57-inch eye-level standard, feels more grounded and intentional. Hanging art above door-frame height is one of the most common decorating mistakes, as it disrupts the cohesive flow of your living space.
First, determine your ideal center height on the wall, which is typically 57 inches. Next, pull the hanging wire on the back of your frame taut and measure the distance from the top of the frame down to the wire. Subtract this measurement from 57 inches. For example, if the taut wire is 3 inches from the top of the frame, you'll place your nail at 54 inches (57 - 3 = 54) on the wall.
The bottom of your frame should be 6 to 8 inches above the back of the sofa. This specific spacing creates a strong visual connection between the two pieces, making them look like a cohesive unit. If you hang the art any higher, it will appear to be floating randomly on the wall. When considering how high to hang pictures over furniture, this 6-to-8-inch rule overrides the standard 57-inch rule.
Start by choosing a central, anchor piece and hang it with its center at 57 inches. Then, build your arrangement out from that piece, maintaining a consistent spacing of 2 to 3 inches between each frame. Before you hammer any nails, we recommend tracing each frame onto paper, cutting them out, and taping them to the wall. This allows you to perfect the layout and balance without making unnecessary holes.
No, not all pictures in a room need to be hung at the exact same height. Instead, they should follow a consistent visual logic. For standalone pieces on an open wall, use the 57-inch centerline. For art over a console table or sofa, use the 6-to-8-inch rule. The goal isn't a rigid, uniform line around the room; it's to ensure each piece relates correctly to its immediate surroundings, creating overall harmony.
You should leave 4 to 6 inches of space between the top of the mantel and the bottom of the picture frame. This creates a deliberate gap that prevents the space from looking crowded while still connecting the art to the fireplace as a single focal point. Hanging the artwork more than 8 inches above the mantel is a common error that makes the art feel disconnected from the architectural feature below it.
{"one"=>"Select 2 or 3 items to compare", "other"=>"{{ count }} of 3 items selected"}
Leave a comment