
Made in America (NJ)
for your Wall Decor
Handcrafted Picture Frames

What if the heavy boxes of photos in your attic weren't a source of guilt, but the foundation of your home's most beautiful room? Many people feel paralyzed by the sheer volume of inherited prints, worried about what to do with old family photos while fearing they might fade or degrade in storage. It's easy to feel overwhelmed when you're staring at thousands of unidentified faces. However, these images are more than just paper; they represent your history and deserve to be seen.
We agree that the pressure to preserve every single snapshot is exhausting. You shouldn't have to choose between a cluttered drawer and an empty wall. This article teaches you how to sort your collection with confidence, utilize modern AI tools for organization, and select the perfect archival-quality frames to honor your ancestors. You'll learn how to turn a disorganized archive into a stunning, professional display that tells your family's unique story. From choosing the right scanning resolution to designing a custom gallery wall, we'll help you transform those dusty boxes into a curated legacy.
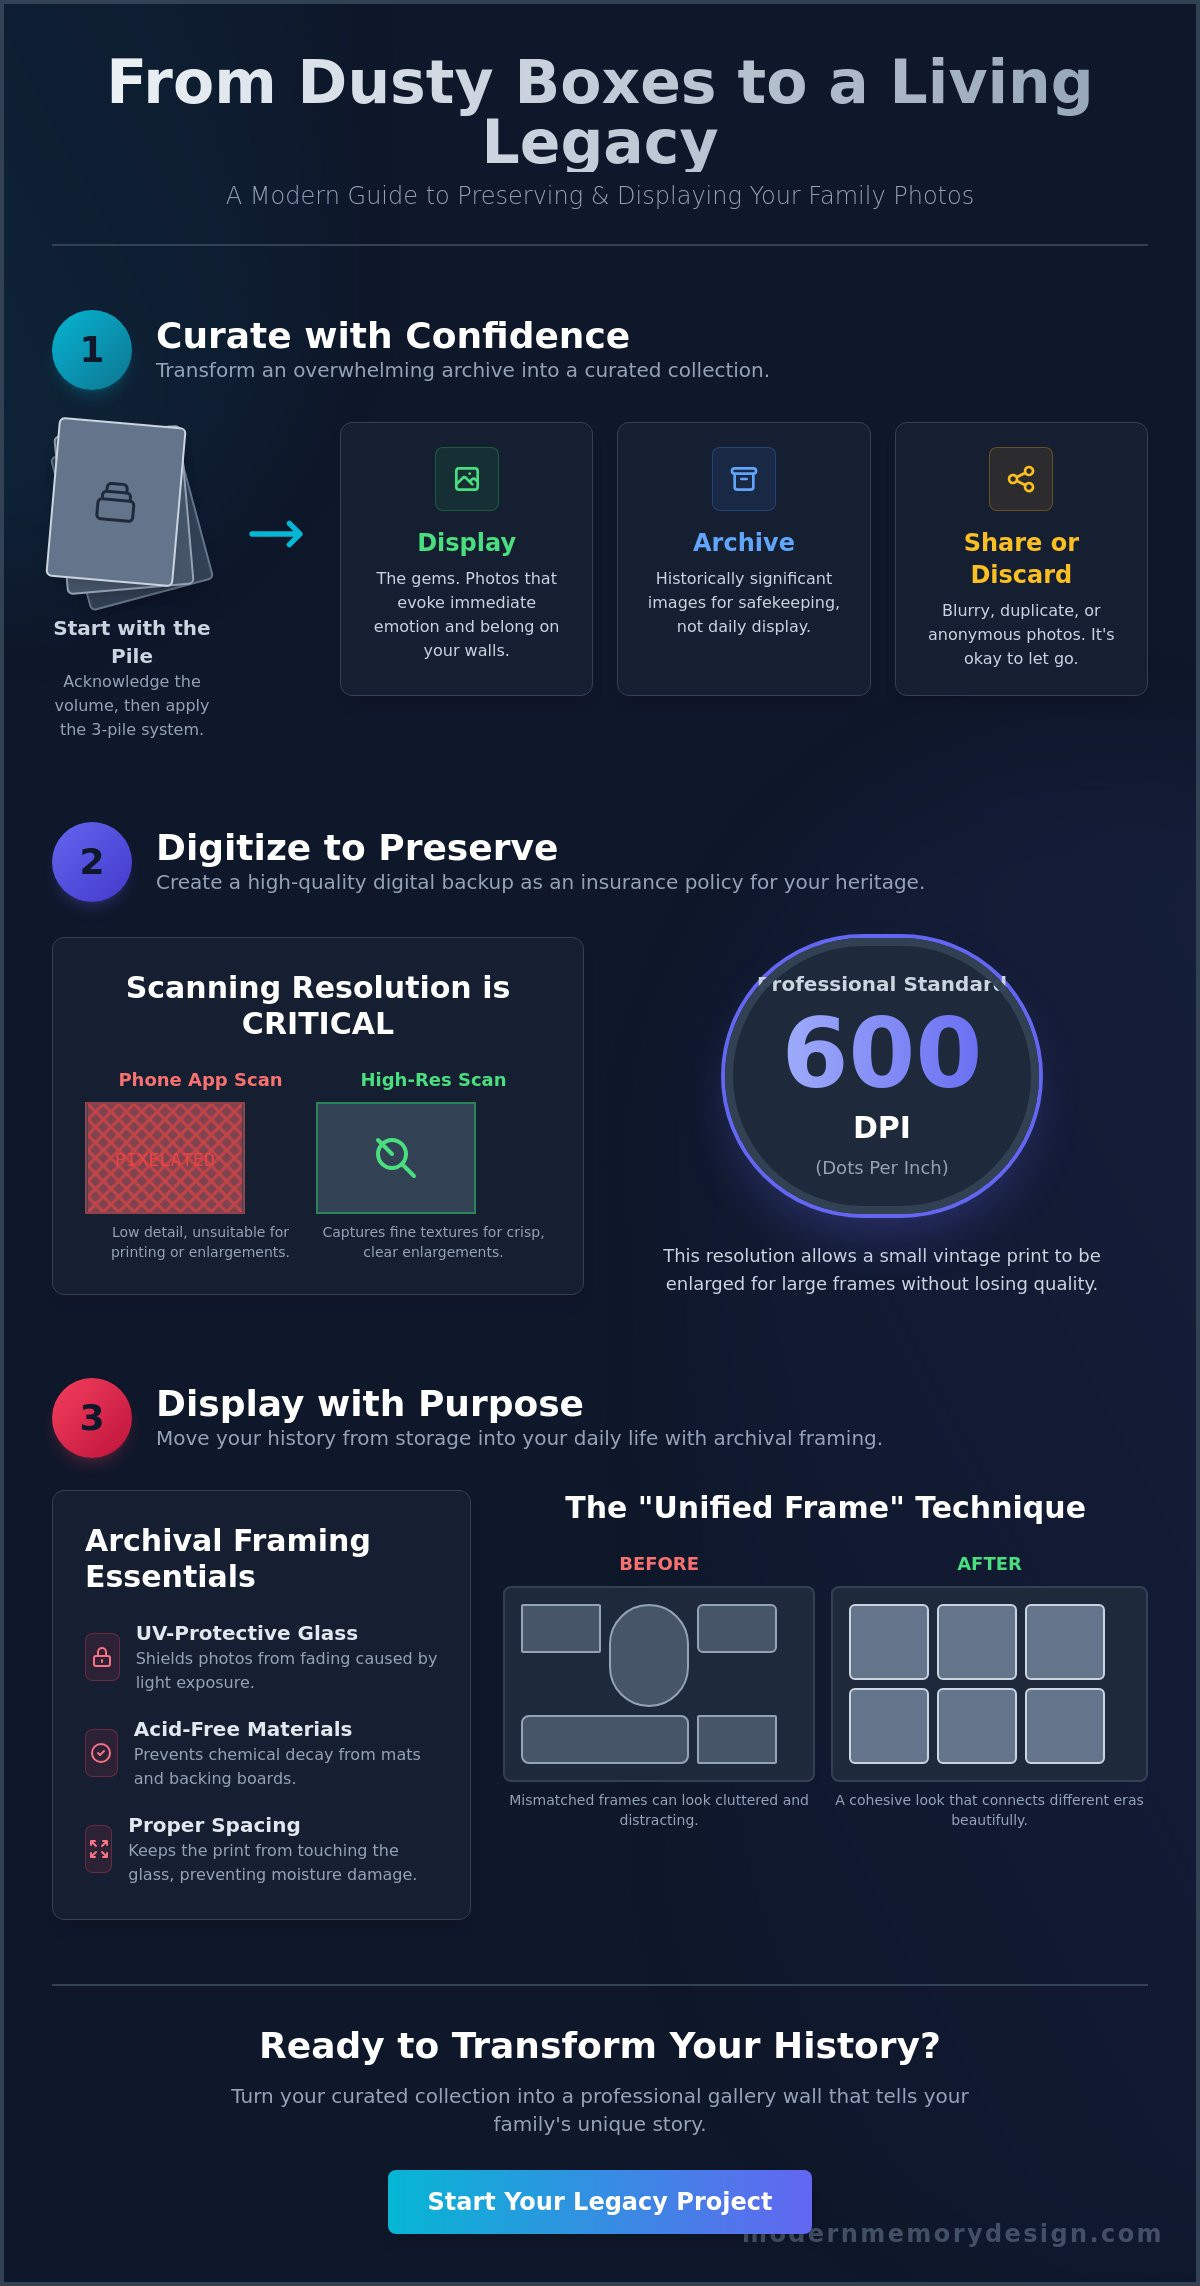
Deciding what to do with old family photos often starts with a daunting pile of boxes. Most people assume they need to save every single scrap of paper to honor their ancestors. However, there is a major difference between maintaining a historical archive and building a living legacy. An archive is a comprehensive record kept for research; a living legacy is a curated selection designed to breathe life into your home. Perfectionism is your biggest enemy here. If you wait until you've identified every face and date, the project will never leave the basement.
To move forward, use a simple three pile system. The first pile is for "Display," featuring photos that evoke immediate emotion. These are the gems that belong in your daily sightline. The second is for "Archive," consisting of historically significant images that don't necessarily belong on a wall. For these, it is helpful to understand the conservation and restoration of photographs to ensure they survive in their storage boxes. The final pile is for "Share or Discard." It's okay to let go of blurry landscapes or photos of strangers. Your family history is better served by a dozen meaningful images than a thousand anonymous ones.
Guilt often stops people from thinning out their collection. You might feel like you're erasing history by tossing a photo of a relative you don't recognize. Remember that a collection of 5,000 unsorted photos is rarely looked at. By narrowing the field, you're actually making your family history more accessible. You're choosing to highlight the stories that matter most to your current generation.
The "Inside-Out" method simplifies the sorting process. Instead of working through everything chronologically, pick your top 10 iconic photos first. These should be the images that stop you in your tracks. Don't worry about technical flaws like a small tear or slight discoloration. Professional online photo printing services can often enhance these images, restoring vibrance to a faded memory. Focus on the storytelling. A candid shot of your grandfather laughing at a picnic is often more valuable than a stiff, formal portrait where everyone looks uncomfortable.
Identifying which moments are truly wall-worthy requires a different lens. Look for strong compositions or deep emotional connections. You can group these by era, such as a "1940s Wedding" theme, or by family lineage. Planning your edit around standard picture frame sizes early on makes the transition from box to wall much smoother. This foresight ensures your curated legacy fits perfectly into a cohesive gallery wall without the stress of mismatched proportions later. When you know what to do with old family photos from the start, the path to a beautiful home gallery becomes clear and manageable.
Physical photos are under constant threat from light, humidity, and the simple passage of time. Digitization isn't just a modern convenience; it's a vital insurance policy for your heritage. When you're deciding what to do with old family photos, your first priority should be creating a high-quality digital backup before the original prints degrade further. Digital files allow you to share memories with relatives across the globe and provide a safety net if the physical originals are ever lost or damaged.
Many people make the mistake of using quick phone scanning apps. While these are fine for social media, they often lack the detail needed for professional re-printing. Following the professional standards for Digitizing Family Papers and Photographs ensures your digital files remain useful for decades. Aim for a resolution of at least 600 DPI (dots per inch). This high level of detail allows you to enlarge a small, vintage 4x6 print into something suitable for large picture frames without losing clarity or seeing pixelation. High-resolution scans capture the fine textures and nuances that make old photos feel authentic.
A flatbed scanner offers the most control for delicate or fragile items. Before scanning, use a soft, lint-free microfiber cloth or a gentle puff of air to remove surface dust. Avoid using chemical cleaners, as these can permanently damage the photo's emulsion. If you have thousands of photos, professional scanning services are a reliable alternative. They use high-speed equipment that maintains color accuracy and provides consistent results. Once scanned, name your files descriptively. Use a standard format like "YYYY-MM-DD-Location-Event" so your digital archive stays organized for future generations.
Digitization doesn't mean you should discard the originals. However, you must move them out of old "magnetic" albums with sticky pages. These pages contain harmful acids that eat away at photo paper over time. Switch to acid-free and lignin-free storage boxes designed for long-term preservation. Environmental factors are equally important. Avoid storing your boxes in the attic or basement, as these areas suffer from extreme temperature swings and high humidity. A climate-controlled closet inside your main living area is the safest spot for your physical history. Once your images are safely digitized and stored, you can begin the exciting process of bringing them back into your home decor with custom framing solutions.
Once you have digitized your collection, you face the question of what to do with old family photos to keep them from returning to a dark box. Many people default to photo books because they save space. While books are practical, they don't provide the daily emotional impact of a curated wall display. Transforming your home into a living gallery makes your history visible and part of your current life. It turns a static archive into a focal point that sparks conversation with every guest.
Blending different eras is a common challenge. You don't have to separate your 1920s black-and-white portraits from your 1980s color snapshots. Mixing these generations creates a rich, textured narrative. The key is using a consistent framing style or a shared color palette in the mats to bridge the chronological gap. This approach highlights the continuity of your family line rather than the differences in film technology. It makes the display feel like a deliberate design choice rather than a random assortment of prints.
The "Storytelling Frame" is a powerful tool for adding depth to your display. Instead of a single image, consider using multi-opening mats. You can pair a childhood photo of a grandparent with a photo of them in later years. Including a small, typed description or a copy of a handwritten note inside the frame adds vital context. This ensures the story behind the image isn't lost when the next generation inherits the piece. It transforms a simple photograph into a documented historical artifact.
A chronological hallway gallery is an effective way to walk guests through time. You can start at one end with your earliest ancestors and move toward current family members. This layout works best when you use custom picture frames to unify mismatched photo sizes. Since vintage prints rarely come in standard dimensions, custom sizing allows you to maintain a clean, professional grid despite the varying shapes of the original paper. For a dynamic home, try using easy-access frames that allow you to rotate your displayed photos seasonally without damaging the prints.
Framed memories make some of the most impactful gifts for family members. Creating "heritage sets" for siblings or children ensures that everyone has a physical connection to their roots. A professionally framed 8x10 enlargement of a meaningful moment carries more weight than a digital file ever will. You can add extra value by placing a family tree or a personal letter inside the frame backing. This simple addition turns a beautiful piece of wall art into a complete historical record that stays protected for years to come.
Old prints are physically fragile; they require far more protection than a standard digital snapshot from your phone. When considering what to do with old family photos, you must prioritize archival safety. Vintage paper is susceptible to acid migration and environmental damage. Using professional framing techniques ensures these memories don't yellow or brittle over time. UV-protective glass is a non-negotiable component of this process. It blocks harmful light rays that cause irreversible fading. This is especially vital for color photos from the 1960s and 70s which are prone to shifting toward a magenta or orange hue.
Proper matting provides more than just an aesthetic border. It creates a "breathing space" between the photo and the glass. Without this gap, moisture can become trapped, causing the photo emulsion to stick to the glass surface. This often leads to permanent damage if you ever try to remove the image. Choosing the right frame style also matters. An ornate, gilded frame might suit a formal Victorian portrait, whereas a clean, minimalist wood frame helps a mid-century candid shot feel fresh and contemporary. The goal is to select a style that honors the era of the image while fitting into your current home decor.
The most efficient way to handle your digital scans is through a direct upload-and-print service. This allows you to keep your original heirlooms safe in archival storage while displaying high-quality replicas. When choosing a paper finish, matte or lustre options usually work best for vintage aesthetics. Glossy finishes can create distracting glares that obscure fine details in older, lower-contrast images. All materials, from the backing board to the mounting tape, must be archival-grade to prevent chemical reactions that cause unsightly yellowing. This meticulous approach ensures your legacy remains vibrant for the next century.
One of the biggest hurdles with heritage projects is that vintage photos rarely fit into modern picture frame sizes. Before the standardization of the 4x6 or 8x10, prints came in a wide variety of odd dimensions. Custom-cut mats solve this problem by allowing a non-standard photo to sit perfectly within a larger, balanced frame. For families with physical artifacts, shadow boxes offer a way to display medals or letters alongside a portrait. This creates a three-dimensional tribute that tells a deeper story than a flat image alone. If you are ready to move your history out of boxes and onto your walls, explore our custom framing options to find the perfect fit for your unique collection.
You have sorted your collection, secured your digital backups, and selected your most meaningful prints. The final step in deciding what to do with old family photos is the physical installation. A well-executed gallery wall turns a blank space into a narrative journey. It moves your history out of the shadows and into the heart of your home. To achieve a museum-quality look, you must plan for both current impact and future growth.
The "Unified Frame" trick is one of the most effective ways to create a cohesive display. While your photos might span a century of different film types and paper textures, using a single frame style provides a visual anchor. A consistent black wood or natural oak frame pulls disparate images into a single, intentional collection. This approach allows the focus to remain on the faces and stories rather than the mismatched borders. It creates a sense of order that makes even a large collection feel curated rather than cluttered.
Family history is rarely a finished project. You will likely discover more images as other relatives contribute to your archive. When planning your layout, choose a staggered or "cloud" arrangement rather than a rigid grid. This flexible style allows you to add new frames to the edges without needing to take down the entire display. It ensures your legacy wall can grow alongside your family tree. Professional installation provides the final touch, ensuring every piece is perfectly level and securely mounted for long-term safety.
Begin by laying your framed photos out on the floor. This allows you to find a perfect balance of sizes and orientations before you make a single hole in the wall. Aim for a mix of large focal points and smaller supporting images. You can consult our gallery wall guide for specific layout inspiration and spacing rules. Incorporating different textures, such as a mix of matted prints and canvas stretches, adds visual depth. Once you're happy with the floor arrangement, create paper templates of each frame to tape onto the wall. This lets you visualize the final result in your actual space.
If you prefer a hands-on approach, visit our Hasbrouck Heights shop for a personal design consultation. We help clients in the NJ and NYC area navigate the technical details of custom framing and layout design. Our team understands the weight of these heirlooms and treats every print with the respect it deserves. For large-scale installations or heavy, oversized frames, we offer a professional picture hanging service to ensure your display is both beautiful and safe. Ready to honor your history? Start your custom framing project today and turn your old family photos into a stunning home gallery.
Your family photos are more than just paper; they are the visual record of your unique heritage. By applying the curation and preservation techniques we have covered, you transform a fragile archive into a resilient legacy. High-resolution scanning and the use of archival-grade materials are your best defenses against the passage of time. These steps ensure that the faces and stories of your ancestors remain vivid for the next century.
Deciding what to do with old family photos doesn't have to be a source of overwhelm. We simplify the process by offering professional printing and framing in one convenient place. Every frame is handcrafted in New Jersey using meticulous standards and expertise. We use only archival-grade materials to prevent yellowing and protect your heirlooms from environmental damage. It's time to move your history out of the shadows and into the heart of your home.
Design Your Custom Family Photo Frame Now
Don't let your history stay hidden in a box. Start with your ten most iconic images and watch your family story come to life on your walls. Your legacy is ready to be seen, and we are here to help you honor it with quality craftsmanship.
Yes, it is perfectly acceptable to discard photos that lack emotional or historical value. You don't need to keep every blurry landscape or duplicate print to honor your ancestors. Focus your energy on the images that tell a clear story or feature recognizable faces. Culling the "clutter" makes it much easier to decide what to do with old family photos that actually matter to your legacy.
The best method is using a flatbed scanner set to at least 600 DPI. This high resolution captures the fine details necessary for professional enlargements. If you have a large volume of prints, consider a professional scanning service. These experts use specialized equipment to ensure color accuracy and physical safety for your delicate heirlooms. Always clean the scanner glass with a lint-free cloth before you begin.
Start by showing the images to your oldest living relatives, as they often hold the keys to forgotten stories. You can also use AI-powered genealogy tools that help identify faces across different time periods. Look for contextual clues like fashion styles, car models, or recognizable landmarks in the background. Writing the names on a separate piece of acid-free paper to store behind the frame is a great way to preserve this data.
A classic wood frame in a dark walnut or a simple matte black finish typically complements the high contrast of vintage black and white prints. These styles provide a timeless look that bridges the gap between the 1920s and modern home decor. It is vital to use archival-grade mats to ensure no acids from the frame itself migrate into the century-old paper, which can cause permanent staining.
We strongly suggest using a high-quality reproduction for your wall display while keeping the original in safe, archival storage. This approach protects the one-of-a-kind original from light exposure and humidity. When you choose a professional print-and-frame service, you get a beautiful display piece that looks identical to the original but remains much more durable. This is a smart strategy when planning what to do with old family photos you want to protect.
The most effective way to prevent fading is to use UV-protective glass in every frame. This specialized glazing blocks the harmful light rays that cause colors to shift and details to vanish. Additionally, you should never hang your family gallery in a spot that receives direct sunlight. Even with protective glass, consistent heat and intense light can eventually damage the integrity of the print over several years.
Our physical workshop is located in Hasbrouck Heights, New Jersey, where we provide hands-on design consultations. We serve the entire NJ and NYC region with expert craftsmanship and local roots. You can bring your photos directly to our shop to discuss custom sizes and archival materials. We also offer professional hanging services for clients who want a museum-quality installation in their homes or offices.
Yes, you can frame Polaroids safely by using a deep mat or a spacer. These tools create a necessary gap so the sensitive chemical surface of the Polaroid doesn't touch the glass. Because Polaroids are thicker than standard prints, they require careful mounting with acid-free adhesives. This prevents the image from shifting inside the frame while ensuring no harmful chemicals react with the unique Polaroid emulsion over time.
{"one"=>"Select 2 or 3 items to compare", "other"=>"{{ count }} of 3 items selected"}
Leave a comment