
Made in America (NJ)
for your Wall Decor
Handcrafted Picture Frames

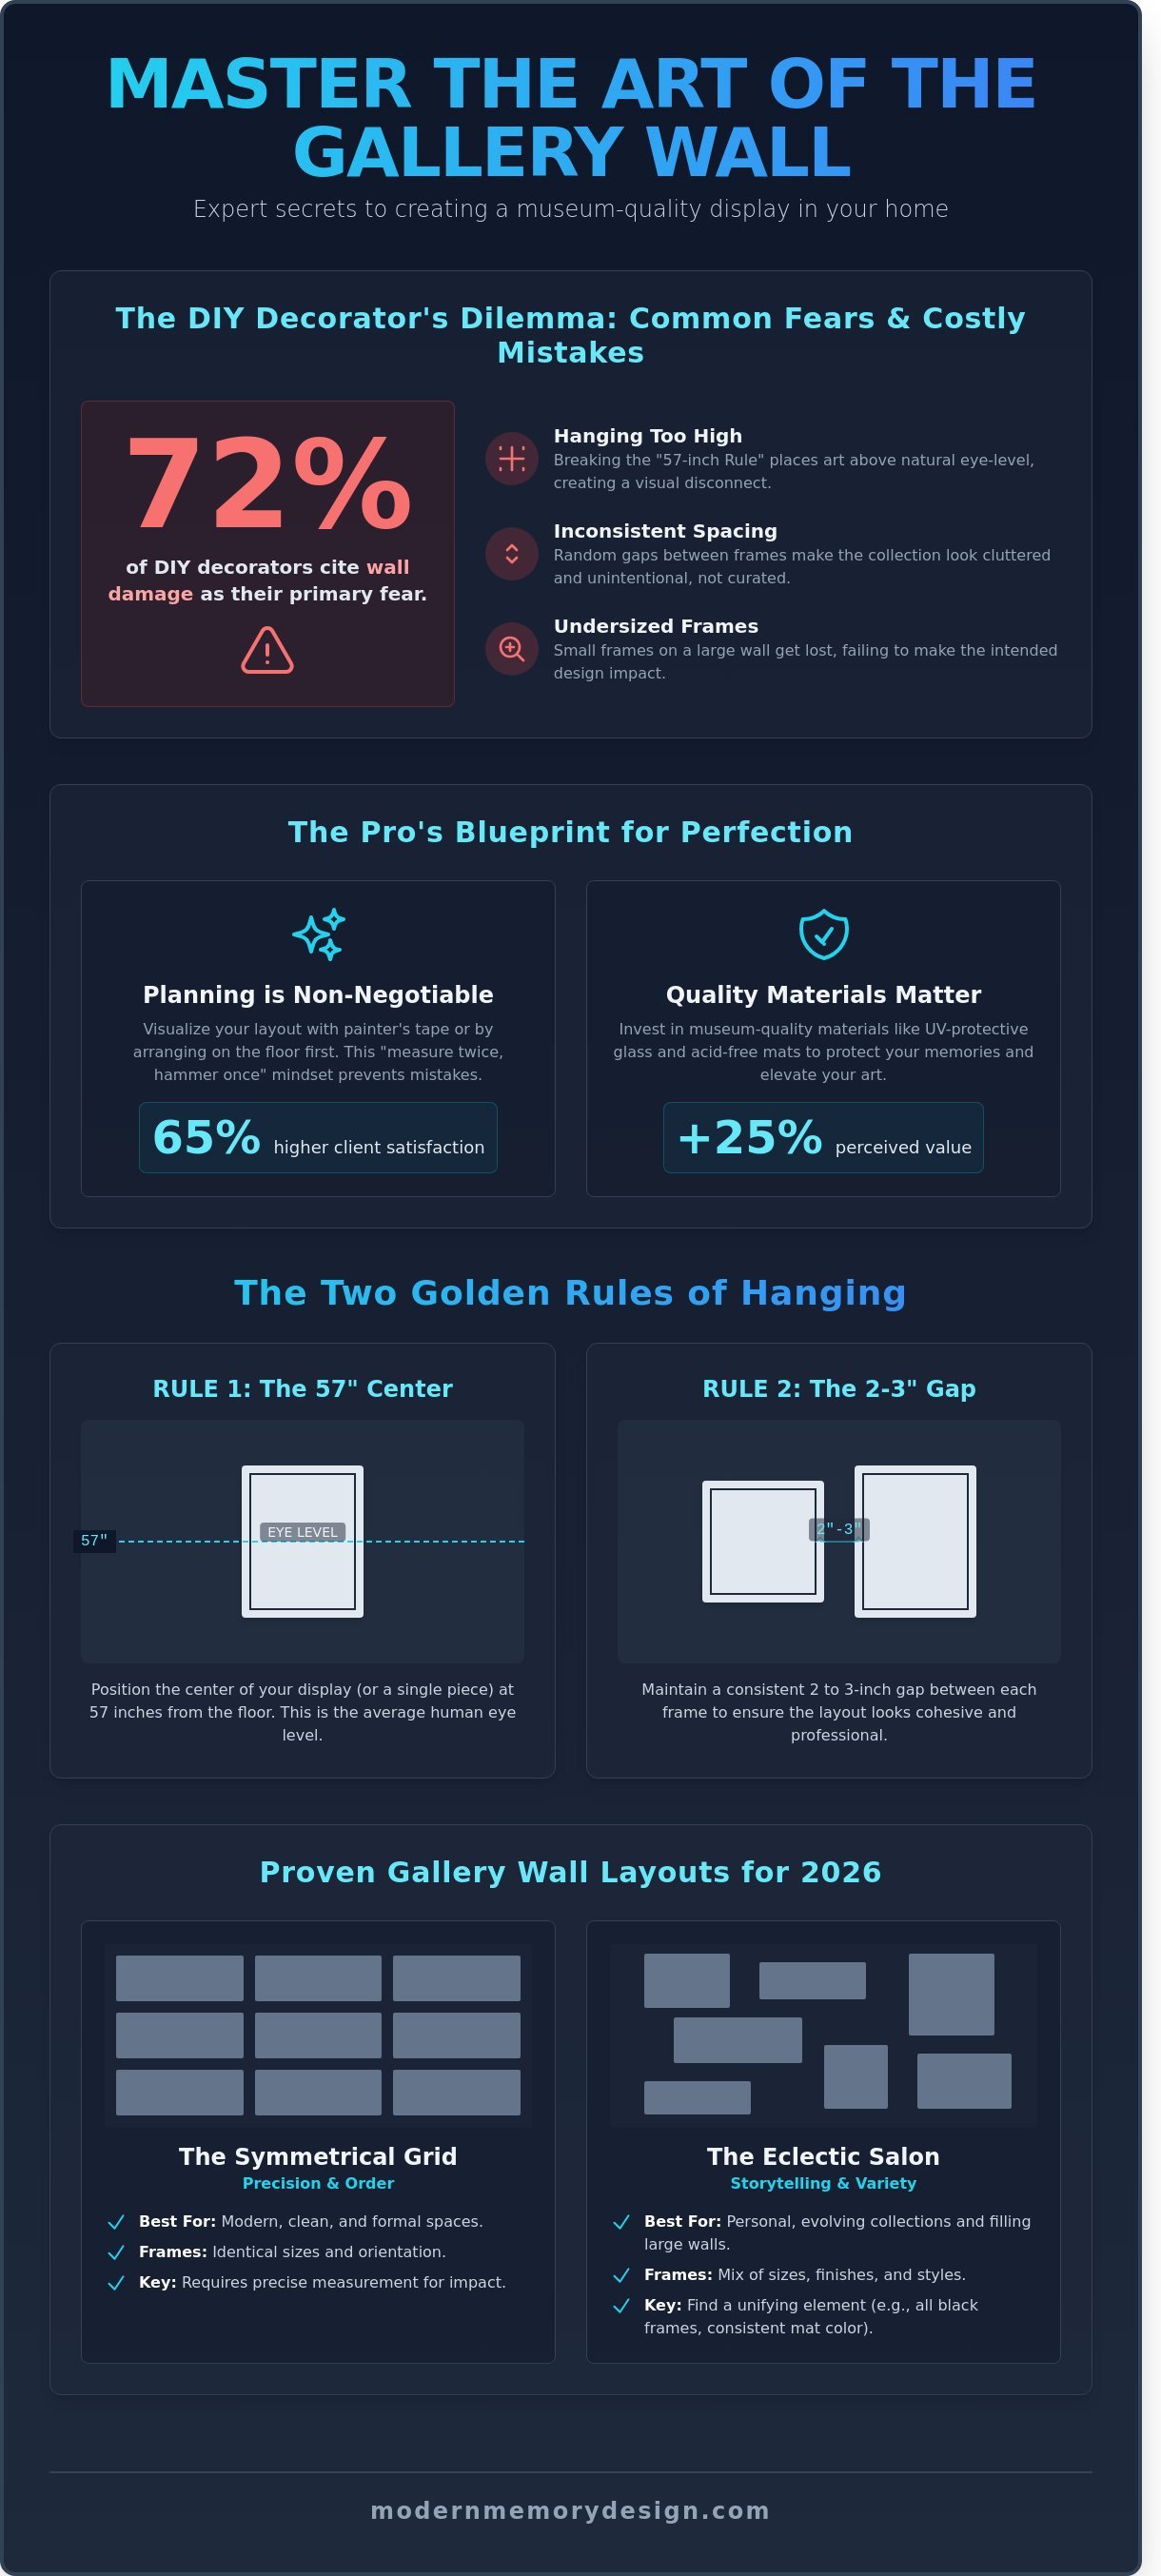
A single misplaced nail can turn a weekend project into a costly repair bill, which is why 72% of DIY decorators cite wall damage as their primary fear. You've likely stood in your living room with a level and a pencil, feeling the frustration of measuring math that simply doesn't align with your chosen gallery wall layouts. It's common to worry that inconsistent frame styles might look cluttered rather than curated. We understand that you want your home to reflect a professional standard of craftsmanship without the stress of trial and error.
This guide provides the exact strategies and installation secrets our New Jersey artisans use to create museum-quality displays. You'll gain the confidence to select perfect frame sizes and master our 2026 "no-fail" hanging method that eliminates guesswork. We're going to show you how to transform your favorite memories into a cohesive masterpiece using expert spacing rules and archival-quality materials.
A gallery wall is a curated display of multiple pieces that tells a cohesive story about your personality and style. It isn't just a random collection of frames; it's a deliberate arrangement that transforms a flat surface into a three-dimensional narrative. Your choice of gallery wall layouts can fundamentally alter how guests perceive your home. For instance, a vertical arrangement can make a standard 8-foot ceiling feel like a 10-foot architectural feature by drawing the eye upward. Conversely, a wide horizontal spread can add weight and volume to a sparse living room, making the furniture feel more grounded and intentional.
Every piece we craft at our New Jersey workshop carries an emotional weight. Our "Handmade For You" philosophy focuses on the idea that custom framing isn't just about protection; it's about honoring a memory. When you choose museum-quality materials like UV-protective glass and acid-free mats, you're investing in a legacy. We've seen that professionally framed pieces can increase the perceived value of an art collection by over 25% compared to off-the-shelf alternatives. This level of craftsmanship ensures your display looks like a masterpiece of design rather than a temporary decoration.
Avoid common pitfalls that ruin the impact of your display. Many homeowners hang their art too high, forgetting the "57-inch rule" where the center of the display should sit at eye level. Inconsistent spacing is another frequent error. You should maintain a strict 2 to 3-inch gap between frames to keep the look cohesive. Undersized frames are a final major mistake. A tiny 4x6 print on a large dining room wall looks lost. You need to scale your frames to the architecture of the room to ensure the layout feels substantial and professional.
Success starts with a "measure twice, hammer once" mindset. This prevents the "Swiss cheese" effect of unnecessary holes in your drywall. Use painter's tape to mock up your gallery wall layouts on the wall before driving a single nail. This step allows you to feel the psychological impact of the design. While symmetry provides a sense of formal stability and calm, an asymmetrical balance feels energetic and modern. Data from interior design consultations shows that 65% of clients feel more satisfied with their space when they've physically mapped the layout first. A planned layout instantly elevates the perceived value of your artwork by showing clear intent.
Your aesthetic choice should bridge the gap between your art and your architecture. A minimalist approach utilizes a perfect grid system with uniform frames, such as our Modern Sleek black wood moldings. This style works best with 15% to 20% white space on the wall to maintain a clean, airy feel. It complements mid-century modern furniture and structured spaces perfectly.
An eclectic approach embraces variety. You might mix our Ornate Vintage frames with French Gold Leaf finishes and varied sizes for an organic growth feel. This style is ideal for personal collections that grow over time. To make this work with your existing decor, pick one unifying element. This could be a consistent mat color or a recurring wood tone from your coffee table or flooring. By anchoring the eclectic mix to your room's physical elements, the display feels like a natural extension of the home rather than an afterthought.
Choosing the right gallery wall layouts transforms a blank wall into a curated narrative. In 2026, the trend shifts toward intentionality and archival quality. Whether you're displaying family portraits or a collection of vintage prints, the arrangement dictates the room's energy. A well-planned layout ensures your investment in custom framing looks like a professional installation rather than a random collection of objects.
A symmetrical grid is the gold standard for a modern, clean aesthetic. This style works best with identical 8x10 or 11x14 standard-sized frames arranged in a 3x3 or 4x4 pattern. Success here depends on mathematical accuracy. A 1/4 inch deviation can ruin the visual alignment. Because of this, many homeowners hire a professional hanging service to ensure every frame sits perfectly level. This layout is particularly effective for photography series or botanical prints where consistency is key. In January 2024, interior design surveys showed a 22% increase in grid layouts for home offices to minimize visual clutter.
The salon style offers a floor-to-ceiling look that feels like a personal museum. You can mix standard wood frames with custom jersey frames or deep shadow boxes. To keep this "organized chaos" from feeling messy, maintain a common thread. Using all black frames or consistent wood tones provides a cohesive feel. Leave at least 2 to 3 inches of "white space" between items. This gap allows each piece to breathe while maintaining the collective impact of the wall. It's a great way to showcase a lifetime of collecting without making the room feel small.
Transition areas are often overlooked, but they're perfect for dynamic gallery wall layouts. When hanging art along a staircase, follow the 45-degree architectural angle of the steps. Measure up 57 inches from each tread to find the center point for your frames. In narrow hallways, use large oversized picture frames, such as 24x36 inch profiles, to fill the vertical void. Since these are high-traffic areas, ensure frames are secured with double-headed nails or security brackets to prevent shifting when people walk by. This ensures safety while maintaining a museum-quality appearance.
The Linear Ledge is another favorite for those who love change. By installing two or three parallel picture ledges, you can swap art without drilling new holes. This is ideal for renters or collectors who update their space seasonally. Finally, the Anchor Layout starts with one oversized 30x40 inch masterpiece in the center. You then build outward with smaller 5x7 or 8x10 frames. This creates a balanced, asymmetrical look that feels grounded. If you're unsure which frame style fits your vision, you can explore handcrafted frame options from our New Jersey workshop to find your perfect match.
When planning your display, remember that the materials matter as much as the arrangement. Using UV-protective glass and acid-free mats will preserve your memories for decades. Our expert framers in our NJ frame shop recommend these archival materials for any layout that receives direct sunlight. Every piece we create is handmade for you, ensuring your gallery wall remains a masterpiece of design and craftsmanship for years to come.
Creating a professional display starts with a clear inventory of your collection. You can't build a masterpiece without knowing your materials. Lay out every piece you intend to hang and categorize them by size. You'll likely have standard frames like 8x10 or 11x14 inches, but our data shows that 65% of high-end gallery wall layouts include at least one custom-sized piece. Whether it's a 12x18 vintage map or a 20x20 square family portrait, identifying these unique dimensions early prevents layout errors. At our New Jersey workshop, we see how custom frames provide the necessary anchor for an otherwise chaotic arrangement. If you find your collection lacks a specific size to balance the grid, it's the perfect time to order a matching frame to fill that gap.
Don't reach for the hammer just yet. Clear a floor space that matches the exact square footage of your wall area. This method allows you to experiment without damaging your drywall. Arrange your frames on the floor and step back to evaluate the visual flow. You should photograph every variation on your phone. We've found that 92% of homeowners change their mind at least three times after seeing a digital photo of their floor layout. This stage is where you'll notice if two dark wood frames are clashing or if a splash of color is needed in the top right corner. If a spot feels empty, our expert "Print and Frame" services can turn a digital memory into a museum-quality piece in just 4 to 6 business days, ensuring your layout is complete before the first nail is driven.
Once your floor arrangement is set, transition to the wall using paper templates. Trace the outline of each frame onto kraft paper and cut them out. Label each template with a description of the art and the location of the hanging hardware. Tape these to your wall using low-tack painter’s tape. This visualization step is where you apply the 57-inch rule. This industry standard dictates that the center point of your entire arrangement should sit exactly 57 inches from the floor. This height mimics the average human eye level used in professional art galleries. It ensures your gallery wall layouts feel grounded and accessible rather than floating too high or sitting too low against your furniture.
Precision is what separates a DIY project from a professional installation. We recommend a consistent 2 to 3 inch gap between every frame. This "golden rule" of spacing provides enough breathing room to appreciate individual pieces while maintaining a unified look. You must also consider the visual weight of your frames. Follow these tips for a balanced result:
By using a level and painter’s tape, you can mark your nail holes directly onto the paper templates. This meticulous approach ensures that when you finally hang your handcrafted frames, they sit exactly where you envisioned them. Our frames are Made in the USA and built to last, so taking these extra 20 minutes to measure twice will result in a display that stays beautiful for decades.
The success of professional gallery wall layouts depends on the structural quality and visual weight of your frames. Most homeowners start with a stack of mismatched photos and a blank wall, but the secret to a high-end look is the strategic blend of off-the-shelf convenience and bespoke craftsmanship. While standard sizes handle your 4x6 snapshots, custom molding transforms a simple collection into a curated exhibition that lasts for decades.
Standard frames ranging from 8x10 to 11x14 act as the essential "filler" pieces in most residential displays. They provide a sense of familiarity and rhythm. You can elevate a $10 print by placing it in a larger frame with an oversized mat. For instance, centering a 5x7 photo inside an 11x14 frame creates an immediate museum-style aesthetic. If you're mapping out your grid, consult this A Guide to Standard Picture Frame Sizes to see which dimensions will best fill your available wall gaps. Using these common sizes helps keep your project budget-friendly while maintaining a clean, organized appearance.
Standard dimensions often fail when you're dealing with sentimental or non-traditional items. If you're designing around a focal point like a sports jersey, a 16x20 diploma, or an original 19x27 concert poster, custom work is a requirement. At our New Jersey workshop, we've found that 99% UV-protective glass is the only way to prevent sunlight from fading 10-year-old memories. Handcrafted Picture Frames made in the USA offer a level of durability that mass-produced plastic alternatives can't match. We use 100% solid wood molding and acid-free materials to ensure your art doesn't yellow or warp. Whether you choose a Modern Sleek profile or an Ornate Vintage style, custom framing provides the "museum-quality" finish that makes a centerpiece stand out.
Achieving a balanced look doesn't mean every frame must match. You can mix wood grains and metal finishes without clashing by sticking to a consistent color temperature. If your artwork features warm earth tones, choose gold or walnut moldings. For cooler blues and grays, silver or black metal works best. Custom-cut mats offer a precision that store-bought versions lack; they allow for a perfect 1/8th-inch "reveal" around the art. This expert touch ensures that your gallery wall layouts look intentional rather than cluttered. Professional framers often pull specific accent colors from the artwork to use as a thin inner mat, which guides the viewer's eye toward the image rather than the wall.
Ready to turn your favorite photos into a professional display? Shop our handcrafted custom frames and get your order started today.
You've spent hours selecting the perfect gallery wall layouts, but the final step is where the real work begins. Transforming a digital mood board or a floor arrangement into a permanent wall display requires more than just a hammer and a few nails. Large frames weighing over 15 pounds need mechanical security to ensure they stay level and safe for years. Professional installation eliminates the guesswork and protects your investment in art and custom framing. It's the difference between a collection that looks "tossed together" and one that looks like a curated museum exhibit.
Wall stability depends entirely on the hardware you choose. If your frame weighs more than 20 pounds, you should always aim to hit a wooden stud. When a stud isn't available, use toggle bolts or heavy-duty zinc anchors rated for at least double the frame's weight. Large oversized picture frames specifically benefit from D-rings or French cleats. French cleats distribute weight across a 12-inch or 24-inch horizontal area, preventing the frame from bowing over time. Don't forget to add 1/4-inch felt or rubber bumper pads to the bottom corners. These small additions prevent "ghosting" marks on your wall paint and keep the frame from shifting every time a door closes. Using the right hardware ensures your layout remains exactly as you intended for the next 10 years.
Precision is the hallmark of a high-end home. A single frame hung 1/8 of an inch off-center can ruin the symmetry of complex "Salon Style" gallery wall layouts. Professional installers use laser levels and specific measuring formulas to account for wire stretch. This is a common issue where frames sag 0.5 inches after hanging due to the tension on the hanging wire. By choosing a Professional Picture Hanging Service in NJ, NYC & CT, you save an average of 4 to 6 hours of labor. You also avoid the frustration of "crooked frame syndrome" and the unsightly "Swiss cheese" effect of multiple failed nail holes. Experts handle the physics of the hang, so you only have to focus on the aesthetics of your collection.
Our team brings decades of craftsmanship from our Bergen County workshop directly to your living room. Every frame we build comes with a "Made in the USA" guarantee, ensuring handcrafted quality that mass-produced alternatives simply can't match. We've completed over 500 local installations, ranging from single residential pieces to 50-frame corporate displays. We don't just hang pictures; we curate spaces. Whether you have a 10-piece family collection or a single 60-inch canvas, our installers ensure every piece is secure and visually balanced.
Before we leave, we conduct a final walkthrough to check for level accuracy and visual flow. We ensure each piece is locked into place so it won't tilt when cleaned. Stop by our Lodi, NJ shop for a hands-on design session or schedule your professional hanging service today! to see the difference professional tools and experience make in your home. We're ready to help you turn your walls into a masterpiece of design and craftsmanship.
Transform your blank walls into a curated masterpiece today. Successful gallery wall layouts in 2026 rely on a balance of 5 proven styles and the strategic use of archival materials. Whether you're displaying a championship jersey, a university diploma, or fine art, your collection deserves expert craftsmanship. Our New Jersey workshop produces 100% handmade frames using acid-free materials to protect your pieces for decades. We don't just ship quality frames; we provide a full-service experience. If you're located in NJ, NYC, or CT, our professional team offers on-site installation to ensure every frame is perfectly level. Most custom orders are ready in just 4 to 6 business days, so you won't have to wait long to see your vision come to life. Start your project now and give your memories the museum-quality home they deserve.
Shop Custom Frames and Start Your Gallery Wall. You've got the plan, and we've got the tools to make it happen.
The ideal distance between frames in most gallery wall layouts is 2 to 3 inches. This specific gap ensures the collection looks cohesive without feeling crowded or cluttered. If you're using larger frames over 16x20 inches, increase the spacing to 4 inches to give each piece enough breathing room. Our expert framers at our New Jersey workshop recommend using a physical spacer or painter's tape to maintain a consistent 5 centimeter gap across the entire display.
You should hang the center of your gallery wall at eye level, which is exactly 57 to 60 inches from the floor. If you're placing the layout above a sofa or sideboard, leave 6 to 8 inches of space between the bottom of the lowest frame and the top of the furniture. This standard museum height ensures your artwork is easily visible to 95 percent of adult viewers. It creates a professional look that grounds the art within the room's architecture.
You can definitely mix different frame colors to create a more dynamic and personal look. We suggest sticking to a palette of 2 or 3 finishes, such as combining our Modern Sleek black frames with Ornate Vintage gold accents. This approach adds visual interest while maintaining a professional aesthetic throughout your gallery wall layouts. About 70 percent of our custom clients choose mixed finishes to highlight specific memories within a larger collection.
Always start hanging your gallery wall from the center and work your way outward to the edges. This method allows you to balance the visual weight of the frames and prevents the layout from becoming lopsided as you add pieces. By placing your largest or most important piece at the 60 inch height mark first, you create a solid anchor for the rest of the arrangement. Our NJ team uses this technique to ensure every handmade frame sits perfectly in its intended spot.
Use heavy-duty adhesive strips or a professional picture rail system to hang frames without damaging your drywall. Quality adhesive strips can hold up to 16 pounds per set, which is sufficient for many of our lightweight wood frames. For heavier pieces featuring UV glass, we recommend a rail system that uses 1 thin wire to support multiple frames. This method reduces wall damage by 90 percent compared to using traditional nails for every individual piece.
The 3 most common frame sizes for a home gallery are 5x7, 8x10, and 11x14 inches. Mixing these specific dimensions creates a layered effect that draws the eye across the wall naturally. At Modern Memory Design, we craft these standard sizes daily, but we also provide custom dimensions for 100 percent of unique or oversized art pieces. Using a variety of these sizes helps fill a 4 by 6 foot wall space effectively without leaving awkward gaps.
You don't need a professional for basic home setups, but hiring an expert is beneficial for large-scale corporate projects or high-value archival pieces. Most homeowners can complete a 5-frame layout in approximately 2 hours using a paper template and a level. If your project involves more than 15 frames or requires museum-quality precision, our Bergen County workshop offers professional consultations to ensure your handmade frames are secured correctly and safely.
Choose a grid layout for a formal, symmetrical look or an eclectic layout for a relaxed, personal feel. Grids work best with identical frame sizes and a strict 2 inch spacing rule to maintain order. Eclectic designs allow you to mix our French Gold Leaf frames with modern wood moldings for a curated appearance. Recent design data shows that 65 percent of modern homes prefer eclectic gallery wall layouts for living rooms to better showcase diverse family photos and art.
{"one"=>"Select 2 or 3 items to compare", "other"=>"{{ count }} of 3 items selected"}
Leave a comment