
Made in America (NJ)
for your Wall Decor
Handcrafted Picture Frames

You’ve found the perfect oversized piece of art, a true centerpiece for your room. You lean it against the wall, step back to admire its handcrafted beauty, and then a wave of anxiety washes over you. That pristine drywall suddenly looks like a minefield of potential mistakes, with one wrong move threatening your new masterpiece.
It's a common feeling. The fear of a treasured frame crashing to the floor and the dread of drilling a hole only to realize it's misaligned are very real concerns. But you don't need to be a professional contractor to get a professional result. This guide is here to replace that anxiety with the confidence of an expert. We'll walk you through exactly how to hang large frames securely, demystifying everything from selecting the right hardware for your wall type to performing the simple calculations needed for a perfectly level, lasting display.
Get ready to master the techniques that protect both your investment and your walls, ensuring your art stays exactly where you want it for years to come.
Hanging a standard 8x10 frame is simple. Hanging a statement piece over 24x36 inches is a matter of physics. Once a frame’s weight exceeds 20 pounds, the forces of gravity and leverage demand a professional approach. The true challenge of how to hang large frames isn't about finding the perfect spot on your wall; it’s about ensuring that spot can safely support the masterpiece you've invested in. This is especially true for our custom, "Made in the USA" solid wood frames, which possess a heft and quality that lightweight plastic alternatives simply can't match.
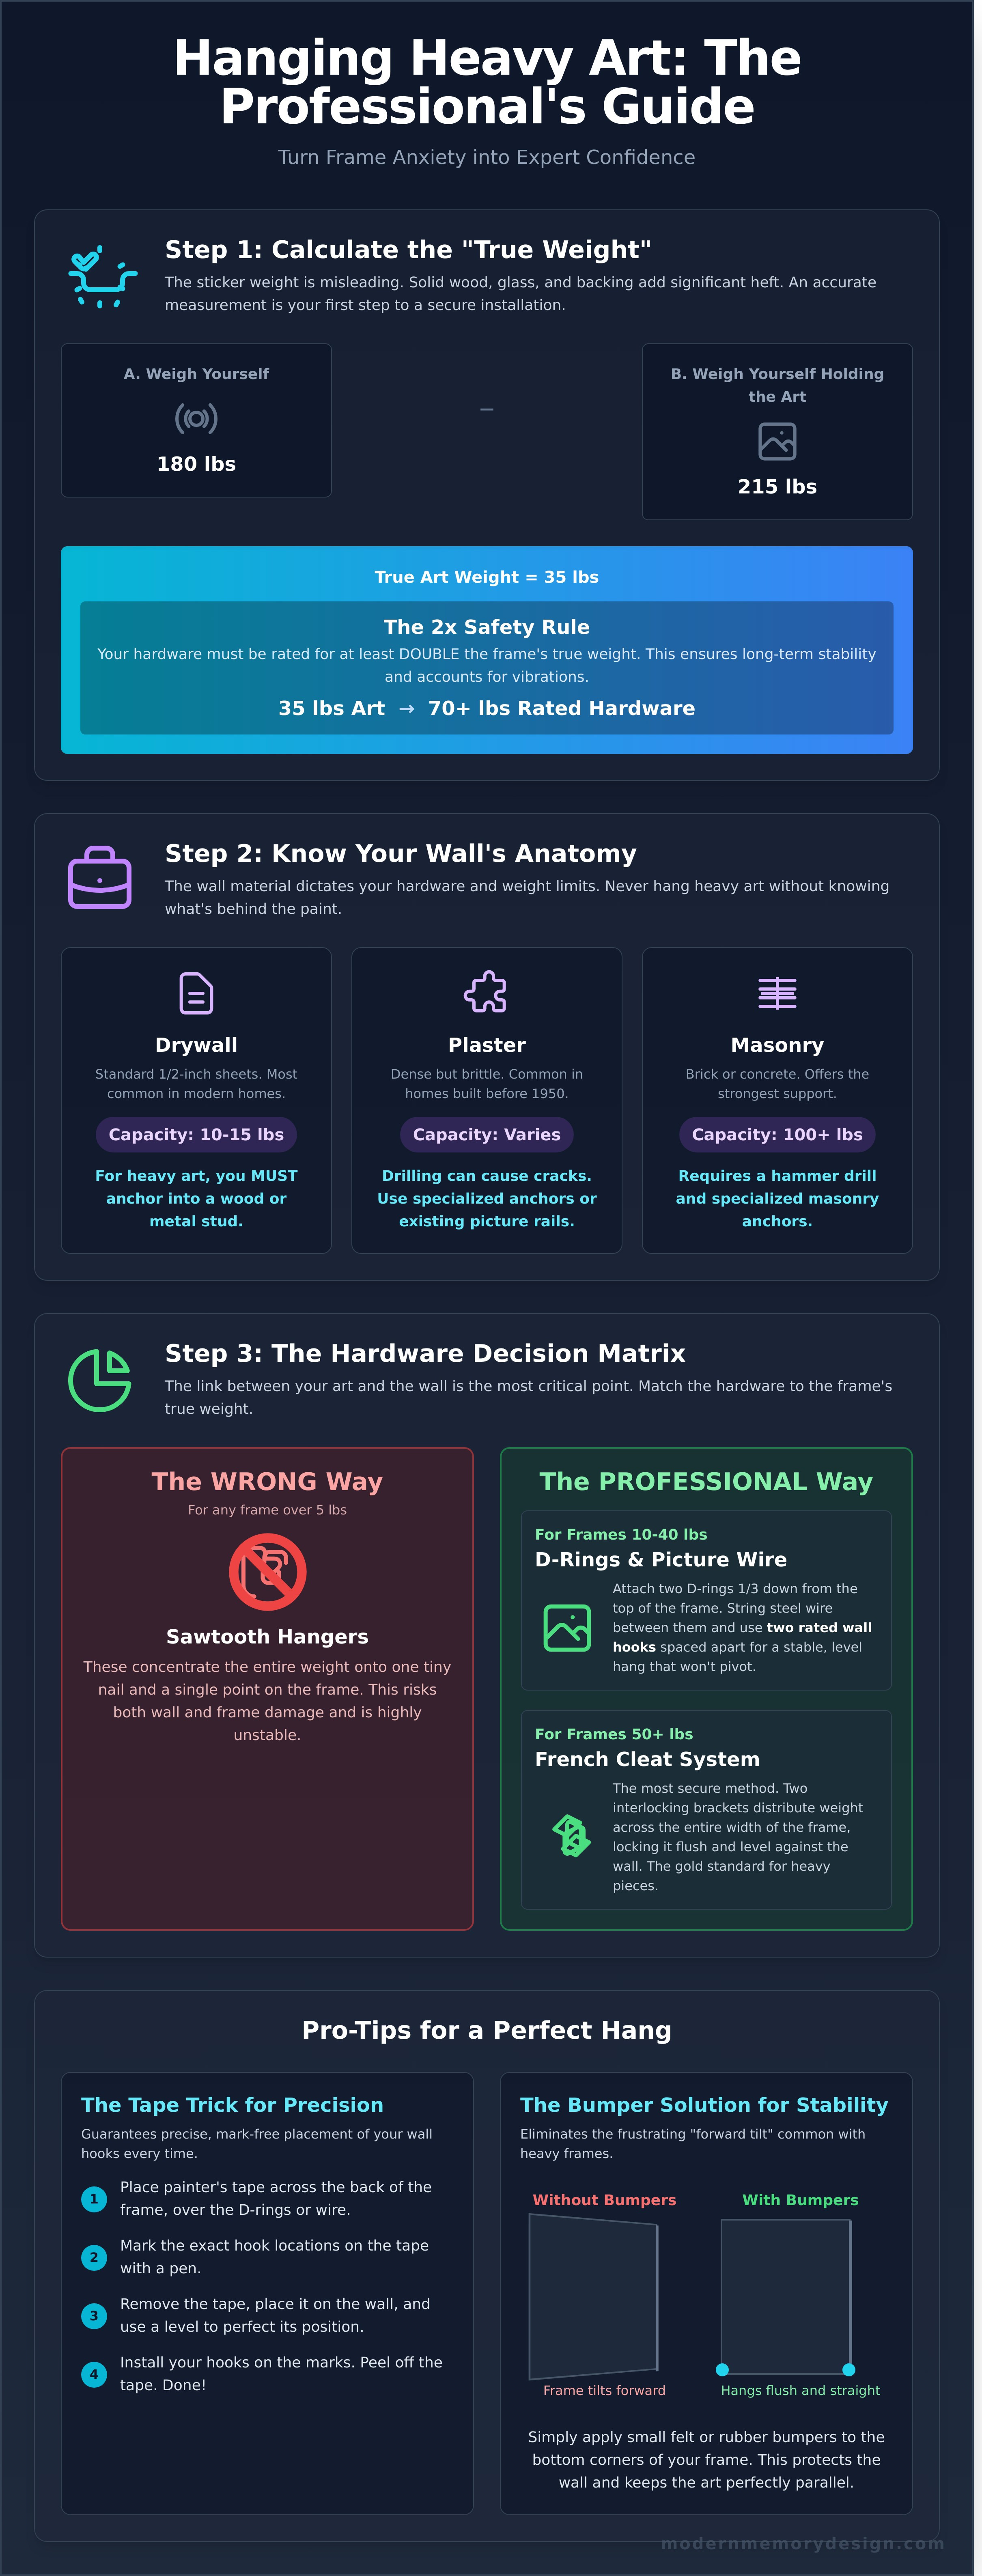
The "sticker weight" of a piece of art is often misleading. The real weight, or "true weight," comes from the sum of its parts. A solid poplar or oak wood molding, for example, can weigh between 2 to 4 pounds per linear foot. Add to that the weight of UV-protective glass (which is significantly heavier than acrylic) and acid-free foam core backing. A 30x40 inch handmade frame can easily top 30 pounds before the art is even considered. Understanding this total load is the first step to a secure installation.
To get an accurate measurement, use a standard bathroom scale. First, weigh yourself. Then, carefully pick up your framed art and step back on the scale. The difference between the two numbers is the frame's true weight. As a rule of thumb for safe installation, always follow the 2x safety rule: if your frame weighs 30 pounds, your hanging hardware must be rated for a minimum of 60 pounds. This accounts for vibrations and ensures long-term stability, protecting the frame's mitered corners, which are the primary structural weak points.
Your wall's material fundamentally dictates your hardware options and weight limits. The three most common residential wall types are:
Wall studs are your strongest anchor point. In most homes built after 1960, studs are spaced 16 inches apart "on center." To find one without a stud finder, start at a corner and measure in 16-inch increments. You can also knock on the wall; a hollow sound will turn into a solid, dull thud when you're over a stud. While hollow-wall anchors like toggle bolts are acceptable for frames under 25 pounds, we always advise securing a heavy, handcrafted frame directly into a stud.
A final consideration for anyone figuring out how to hang large frames is the presence of metal studs, common in apartment buildings constructed in the last 15 years. These require a different approach than wood studs, demanding a titanium drill bit and self-tapping screws instead of traditional wood screws. Identifying your wall’s anatomy is just as important as knowing your frame's weight. Get it right, and your art will hang safely for decades.
The connection between your artwork and the wall is the single most critical point of failure. The wrong hardware won't just make your frame hang crooked; it could lead to a costly, dangerous accident. Selecting the right mounting gear isn't about what's easiest, it's about matching the hardware's load capacity and design to the specific weight and dimensions of your frame. A 5-pound frame has different needs than a 50-pound masterpiece. Let's break down the professional-grade options.
First, let's eliminate the wrong choice. You should almost never use a sawtooth hanger for large or heavy frames. These small, serrated brackets are designed for pieces under 5 pounds. They concentrate the entire weight of the frame onto one tiny nail and put significant stress on a single point of the top frame rail, risking both wall and frame damage.
For custom frames weighing between 10 and 40 pounds, the professional standard is a two-point system using D-rings and picture-hanging wire. For optimal stability and to ensure the frame hangs flush, attach one D-ring to each side rail, positioned 1/3 of the way down from the top of the frame. String a steel picture wire between them, leaving just enough slack so the wire's peak is about 2-3 inches below the top of the frame when pulled taut.
Always use two appropriately-rated wall hooks spaced several inches apart. This creates a stable, level base that prevents the frame from shifting or tilting over time. A single hook acts as a pivot point, allowing the frame to be easily knocked askew. Ensure your hooks are rated for at least 25% more than the frame's total weight; for a 30-pound frame, use hooks rated for 50 pounds.
When you can't anchor directly into a wall stud, you must use a drywall anchor. Standard plastic expansion anchors are not suitable for anything over 15 pounds. They simply can't grip the drywall securely enough to support the sustained downward force of a heavy frame. For a secure hold in drywall, you need toggle bolts. A 1/8-inch spring toggle bolt can support up to 50 pounds in 1/2-inch drywall, while a 1/4-inch version can hold over 70 pounds. The metal wings expand behind the wall, distributing the weight over a much larger surface area, providing the security you need.
For any frame weighing more than 50 pounds, the French cleat is the only truly safe and reliable solution. This system uses two interlocking brackets with a 45-degree angle. One is secured to the wall, and the other is attached to the back of the frame. The frame's bracket slides down securely over the wall bracket, using gravity to lock it in place. This is the ultimate expert-level lesson in how to hang large frames without worry.
The primary advantage is weight distribution. A long aluminum cleat, like a 30-inch model, can be screwed directly into two or even three wall studs (typically spaced 16 inches apart). This transfers the entire weight of a 100-pound piece directly to the structural framing of your house, not just the drywall. The result is an incredibly strong, flush mount that keeps your art tight against the wall for a clean, gallery-quality presentation.
Choosing the right hardware is a critical step we never overlook. At Modern Memory Design, every custom frame is built with its final weight and size in mind, and we pre-install the appropriate professional-grade D-rings or cleat systems for you. Explore our handmade custom frame options to see how we build safety and quality into every piece, handmade for you in our New Jersey workshop.
Once you've chosen the perfect location and the right hardware, it’s time for the main event. Precision and patience are your best assets here. Rushing the process can lead to misaligned art, damaged walls, or worse, a broken frame. This professional method ensures your large frame hangs securely and looks spectacular from the very first try. The right technique is crucial for learning how to hang large frames without costly mistakes.
First, gather your toolkit. Having everything on hand prevents interruptions and helps you maintain focus. Don't substitute these items; each one plays a critical role in achieving a secure, level installation.
The most common mistake is measuring from the top of the frame. Instead, measure the "drop," which is the distance from the top of the frame to the hanging hardware (like a D-ring or wire). Next, apply the 57-inch rule, a standard used by galleries since the 19th century, which places the artwork's center at the average human eye level. To do this, find the frame's center and hang it so that this point is 57 inches from the floor. For a perfect transfer, use the "Tape Trick": stretch a piece of painter's tape across the back of the frame, marking the exact location of the hanging hardware on the tape. Then, peel the tape off and place it on the wall, using your level to ensure it's straight. Your marks are now perfectly positioned on the wall.
With your spots marked, it's time to drill. For drywall, create a pilot hole using a drill bit slightly smaller than your anchor's screw. This prevents the drywall from crumbling. If you're using a toggle bolt, drill a hole large enough for the folded wings to pass through. Pinch the wings, push them through the hole, and listen for the satisfying "pop" as they expand behind the drywall. Gently tug the bolt to set the wings before tightening the screw. If you've located a stud, use a screw long enough to penetrate at least 1 inch into the wood. Since standard drywall is 1/2-inch thick, a 2-inch screw provides a secure hold. Before you drive it all the way in, verify that the screw head is compatible with your frame's D-ring or cleat system.
The Final Drop: Lifting and Seating the Frame. This is the moment of truth. If your frame weighs more than 40 pounds, always work with a partner. Lift with your legs, not your back. Each person should hold one side of the frame, approaching the wall together. Slowly guide the hanging hardware onto the screws or anchors. Don't let go immediately. Gently press on the frame to ensure it's fully seated. If you are an expert and working alone, you can rest the bottom of the frame on a stool or chair to support its weight while you guide the top into place. Once it's on the wall, do a final check with your level. Make any minor adjustments, step back, and admire your perfectly and safely hung masterpiece.
You’ve done the hard work of measuring and drilling, but your large frame still hangs with a noticeable forward tilt. This is one of the most common frustrations when learning how to hang large frames, but it's entirely fixable. The issue almost always stems from using a single picture wire, which creates a pivot point that allows the frame's weight to pull the top away from the wall. Beyond aesthetics, this instability can lead to crooked art and even damage your walls over time.
Achieving a professional, flush-to-the-wall presentation requires a few expert adjustments. These techniques not only solve the forward lean but also protect your walls and ensure your art remains secure for years. Small details, like adding bumpers or performing annual checks, make a significant difference in the longevity of your display.
The physics of a hanging frame are simple: the higher the contact point with the wall, the less it will tilt. A picture wire creates a low pivot point, causing a lean. For a museum-style finish, skip the wire entirely. Instead, attach two D-rings within the top third of the frame’s vertical height and hang each one on a separate, dedicated hook. This two-point system provides superior stability, prevents shifting, and holds the frame flush against the wall.
A heavy frame can leave a permanent "ghosting" mark on your paint, caused by trapped dust and restricted airflow. To prevent this, apply small, self-adhesive rubber bumpers to the bottom two corners of your frame. These create a 1/4-inch gap for air circulation. Equally important are the materials inside the frame. We use only acid-free, archival backing, which prevents acids from leaching out over time and discoloring both your art and the wall behind it.
Once your piece is hung perfectly level, the goal is to keep it that way. You shouldn't ever need to "nudge" a properly secured frame back into place. If a frame is constantly crooked, it's a sign of instability. The two-hook method using D-rings is the permanent solution, as it removes the single pivot point that allows for easy rotation. This method is essential for any piece weighing over 30 pounds.
For ultimate security in high-traffic areas, commercial spaces, or regions prone to earthquakes, consider using security hardware. Systems that use T-head screws and a corresponding locking mechanism anchor the frame directly to the wall, making it impossible to knock crooked or remove without a special wrench. This is the same hardware used by galleries and museums to protect valuable artwork.
Finally, a heavy frame places constant tension on its hardware. We recommend a quick, annual inspection of your large frames every 12 months. Check that the D-ring screws are tight and that the wall hooks show no signs of bending or pulling away from the drywall. This five-minute check ensures your handcrafted masterpiece remains safely displayed. For frames built with museum-quality hardware designed for perfect stability from day one, explore our custom framing options.
You’ve invested in a beautiful piece of art and a custom frame. Now comes the final, critical step: hanging it securely. While the DIY approach works for smaller frames, the stakes are significantly higher with large, heavy, or valuable pieces. A miscalculation doesn't just mean a crooked frame; it could lead to damaged art, a ruined wall, or even injury. The decision to hire a professional is a simple assessment of value versus risk. For a priceless heirloom or a custom frame worth over $1,000, the modest cost of professional installation is a wise investment in peace of mind.
Certain installations move from being a simple choice to a clear necessity. If you're dealing with any of the following complex scenarios, calling an expert is the safest and most effective solution:
The question of how to hang large frames in these environments isn't just about finding a stud; it's about engineering a secure and lasting solution.
A professional art installer arrives with more than just a hammer. They bring specialized tools like commercial-grade scaffolding, rotary hammer drills for masonry, and digital laser levels for flawless alignment. Crucially, reputable installers carry liability insurance, often covering up to $1 million, which protects you from any accidental damage to your art or home. For our clients in North Jersey, our team has specific experience navigating the unique architecture of Bergen County homes, from plaster-and-lath walls that crumble under standard drills to modern constructions with metal studs.
For homeowners in New Jersey, New York City, and Connecticut, Modern Memory Design offers a seamless, expert installation service. Requesting a quote is simple. Contact us through our NJ Picture Hanging Service page with details about your artwork and installation site. During the visit, our insured technicians will handle everything from precise measurements to secure mounting and a thorough cleanup. You can also combine our services for a complete, turnkey solution; let our experts craft your custom frame and then deliver and install it for a flawless finish. This end-to-end process ensures your masterpiece is handled with professional care from our workshop to your wall.
Hanging a large piece of art is the final, rewarding step in transforming your space. You now have the knowledge to assess your wall's structure, select the right hardware rated for your frame's specific weight, and follow a precise process to ensure a level, secure mount. This guide has equipped you with the fundamentals of how to hang large frames, turning a daunting task into a manageable project.
Whether you're starting with the perfect frame or need an expert hand for the final installation, professional support makes all the difference. At Modern Memory Design, our expert framers in Hasbrouck Heights, NJ, specialize in creating custom frames using museum-quality, archival materials designed to last for decades. For homeowners and businesses across the Tri-State area, our professional art installation service guarantees a perfect, secure hang every time. Order your custom large frame or book our NJ hanging service, and display your art with complete confidence.
Yes, you can hang a heavy frame on drywall without a stud by using the correct wall anchors. A standard nail can only hold about 10 pounds in drywall, which isn't enough for large art. For frames weighing 25 to 50 pounds, a molly bolt is a reliable choice. For anything heavier, up to 100 pounds, we recommend using a toggle bolt, which provides the strongest anchor point by bracing against the back of the drywall for maximum security.
The best hardware for a 50-pound picture frame is a French cleat system or two heavy-duty picture hooks rated for at least 75 pounds each. A French cleat, also called a Z-bar, consists of two interlocking brackets that distribute weight across the entire width of the frame. Alternatively, using two separate D-rings on the frame and two corresponding hooks on the wall ensures the weight is balanced and prevents the frame from ever shifting or tilting.
You can stop a large picture frame from leaning forward by moving the hanging hardware higher up on the back of the frame. The closer the D-rings or wire are to the top edge, the tighter the frame will sit against the wall. For a quick fix, place small, self-adhesive rubber bumpers-about 1/4-inch thick-on the two bottom corners of the frame. This pushes the bottom of the frame away from the wall, correcting the angle and making it hang perfectly vertical.
It's always better to use two D-rings without a wire for large or heavy art. A single wire places all the stress on one central point, and it can stretch or even snap over time, causing your art to hang crookedly or fall. The professional standard for how to hang large frames involves attaching two D-rings to the frame and hanging each on its own hook. This two-point system provides superior stability, security, and ensures your masterpiece remains perfectly level.
You should hang a large frame so the bottom edge is between 6 and 8 inches above the back of the sofa. This creates a visually cohesive group, connecting the artwork to the furniture instead of having it float disconnected on the wall. If the wall is tall, you can go slightly higher, up to 10 inches. The goal is to ensure there is a clear, deliberate relationship between the two pieces, making the entire arrangement feel balanced and intentional.
If your wall is made of plaster, you must pre-drill a pilot hole before inserting a screw. Plaster is brittle and will crack or crumble if you try to hammer a nail directly into it. Use a 3/16-inch masonry bit to drill a clean hole, then insert a plastic wall anchor. This provides a secure sleeve for your screw. For frames over 30 pounds, use a stud finder to locate the wood lath behind the plaster for the most secure installation.
No, you should not use adhesive Command Strips for valuable, large, or heavy frames, especially any piece containing glass. While some strips are rated for up to 20 pounds, factors like wall texture, humidity, and temperature can cause the adhesive to fail without warning. For any custom frame weighing over 10 pounds, we recommend the security of mechanical fasteners like a nail and hook or a screw and anchor. It's the only way to guarantee your art stays on the wall.
For a 24x36 frame, you need to use two nails and two hooks. A single nail creates a pivot point that allows the frame to be easily knocked out of level. Using two hooks provides much greater stability and distributes the weight more effectively. As a rule, place the hooks on the wall so they are spaced about 8 inches apart for a 24-inch wide frame. This two-point hanging method is a key part of how to hang large frames like a professional.
{"one"=>"Select 2 or 3 items to compare", "other"=>"{{ count }} of 3 items selected"}
Leave a comment